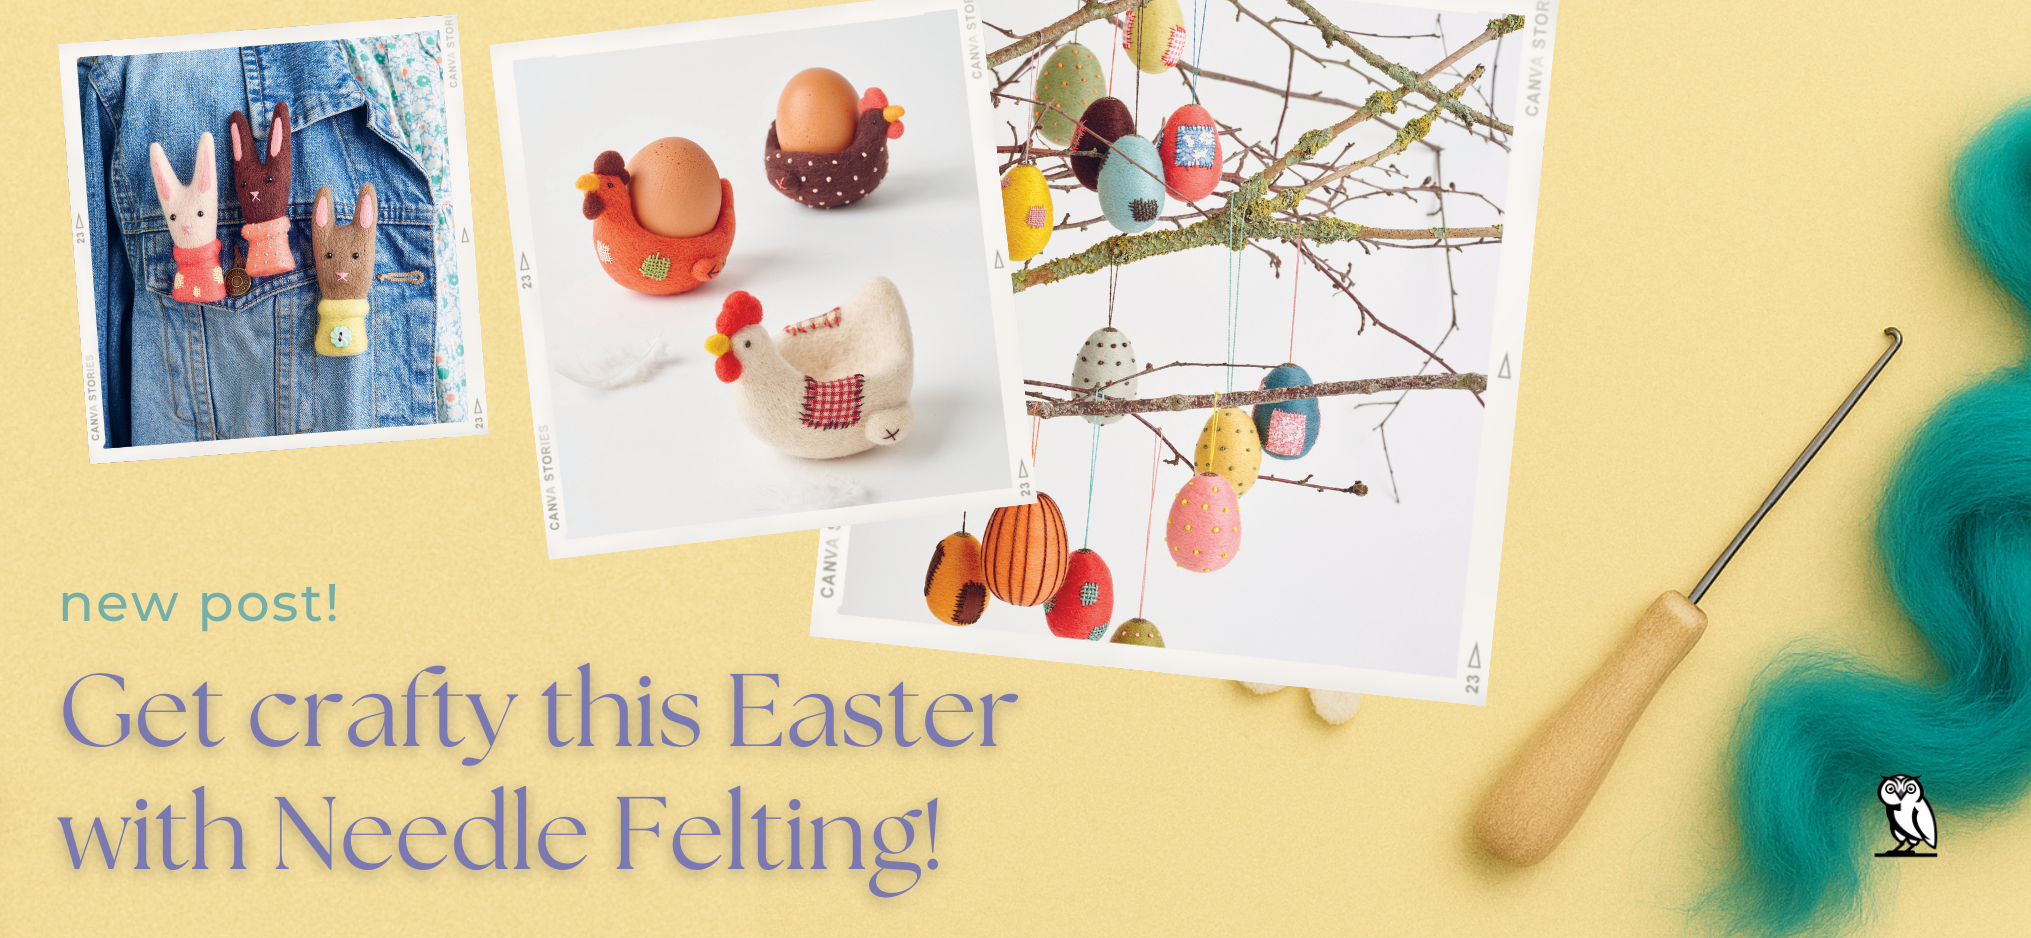
Get creative this Easter with these 3 Handmade Crafts!
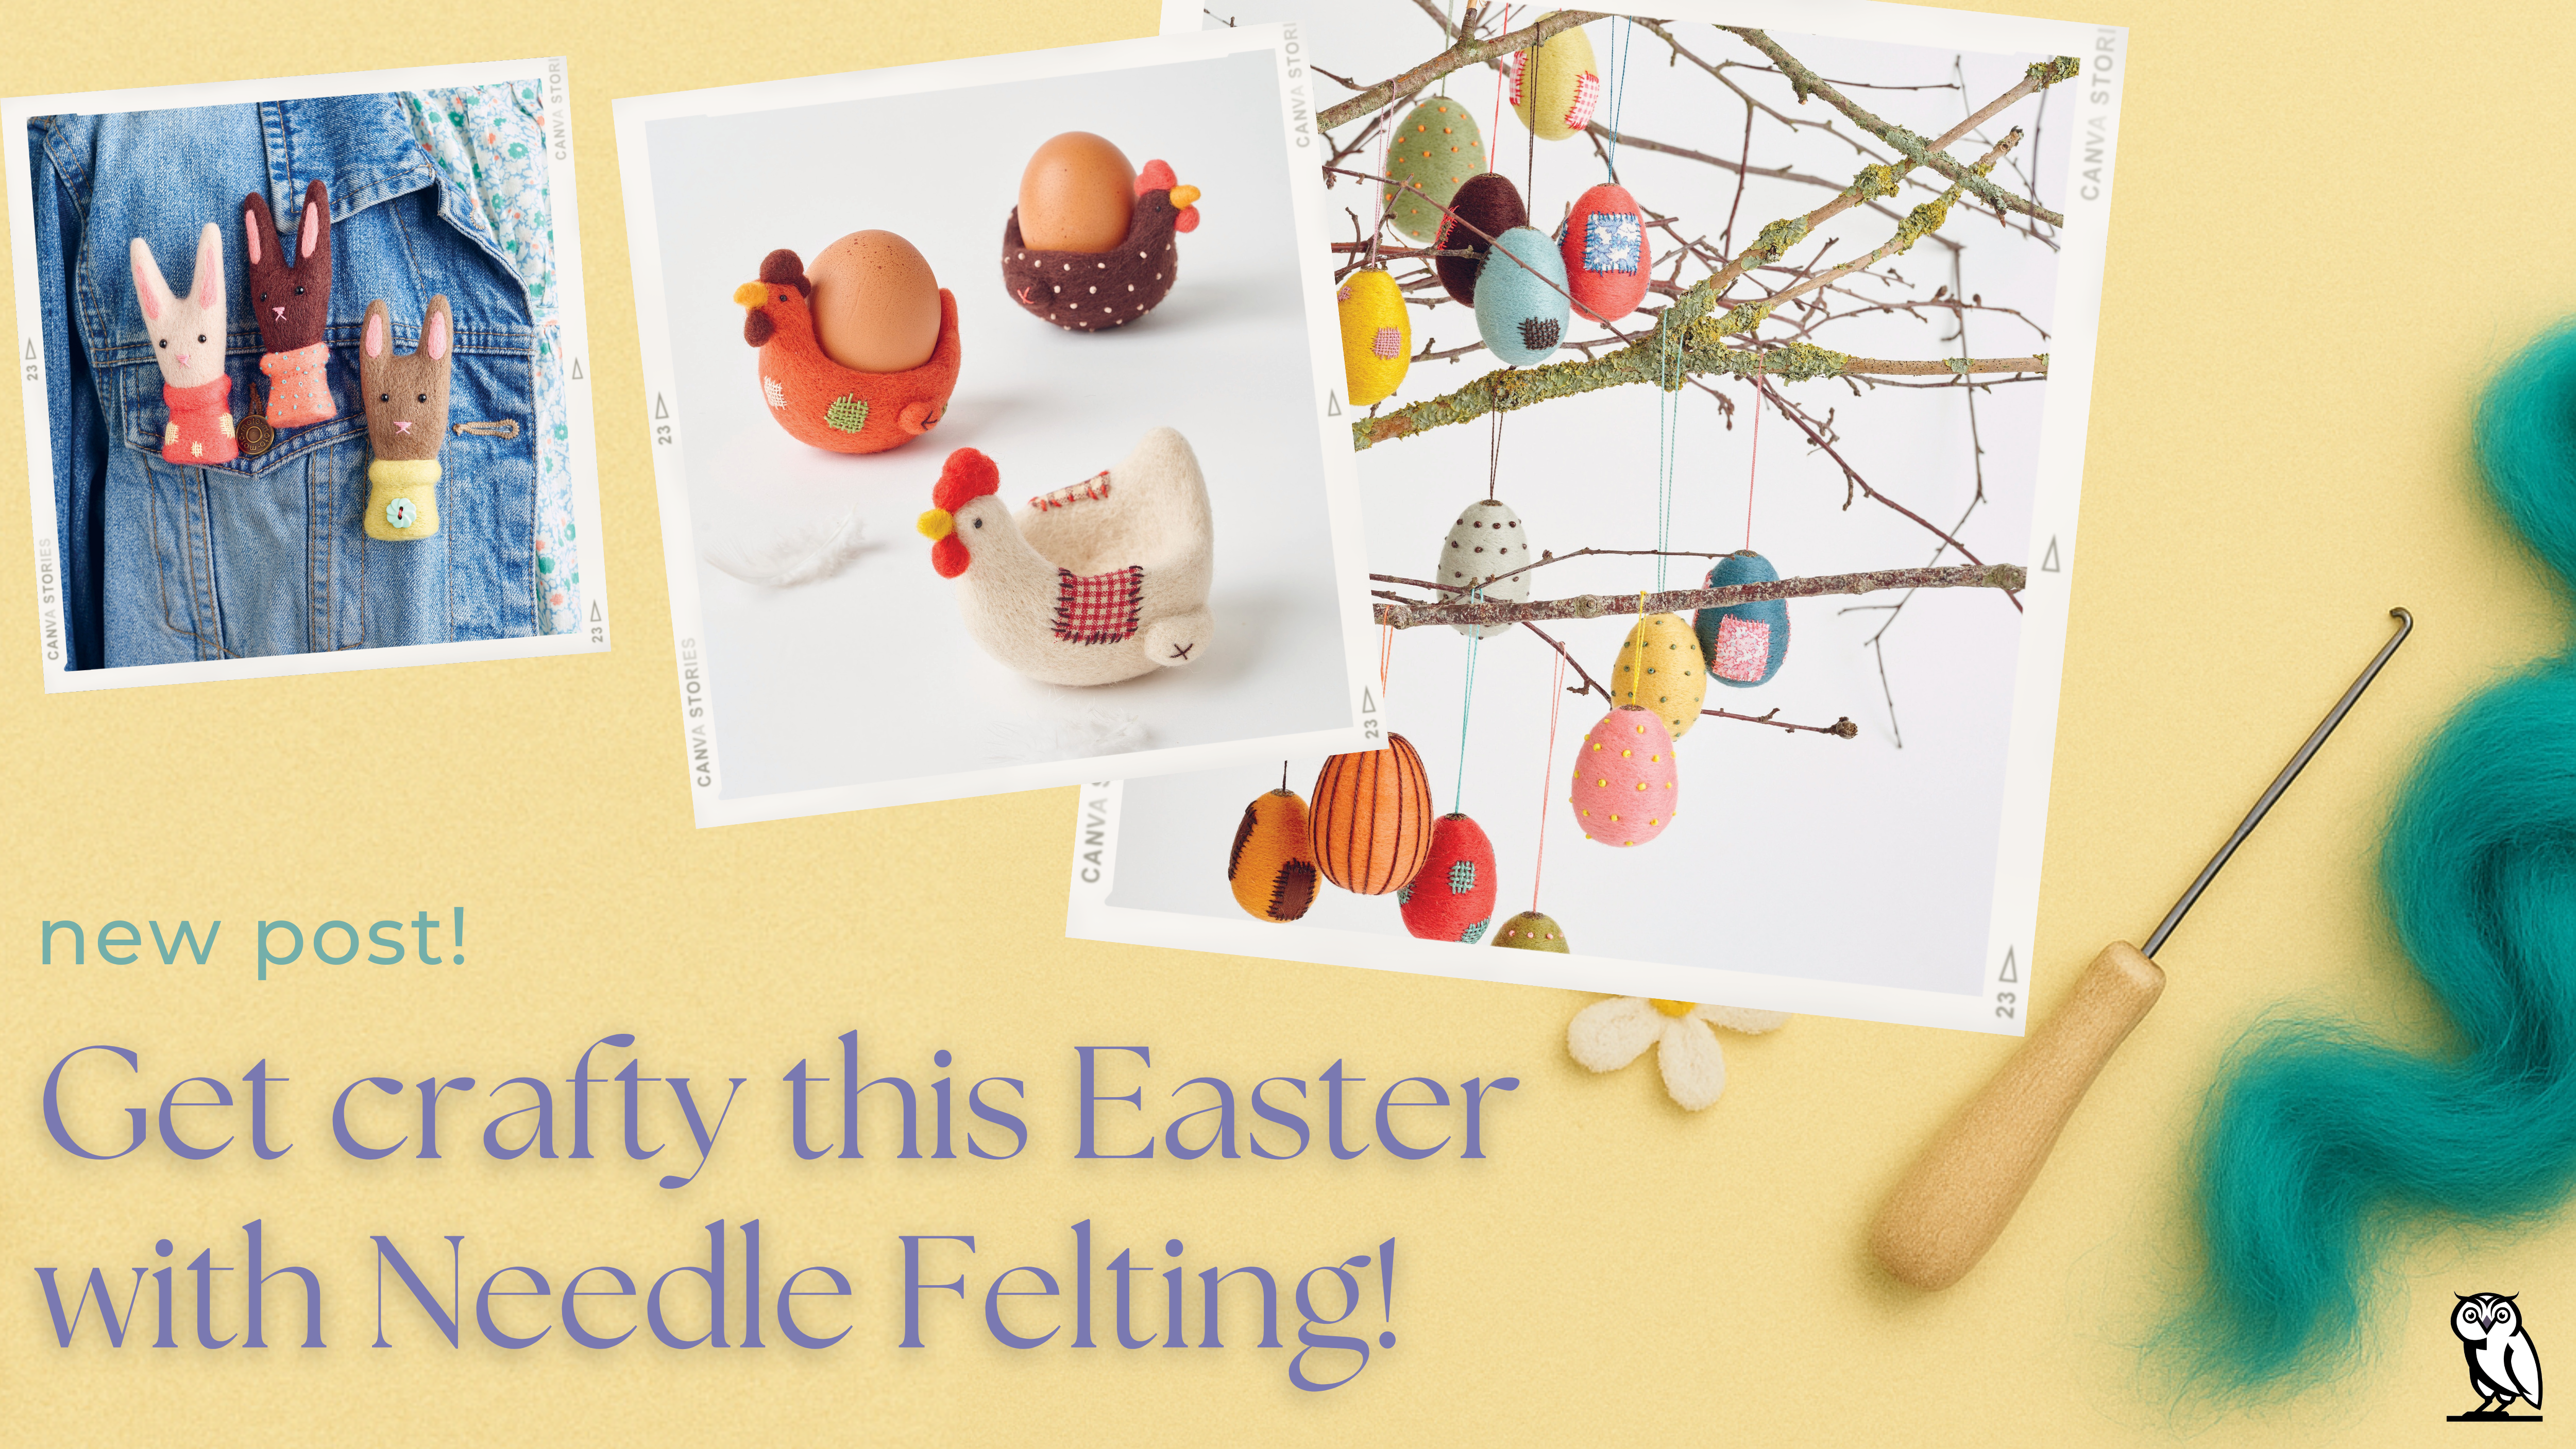 Get ready to hop into the Easter spirit with these fun needle felting crafts! These projects, from Decorative Needle Felting Projects, will guide you through creating Eggs, Chickens & Bunnies – adorable handmade decorations perfect for spring. Whether you’re a beginner or a seasoned crafter, these projects are a delightful way to celebrate Easter!
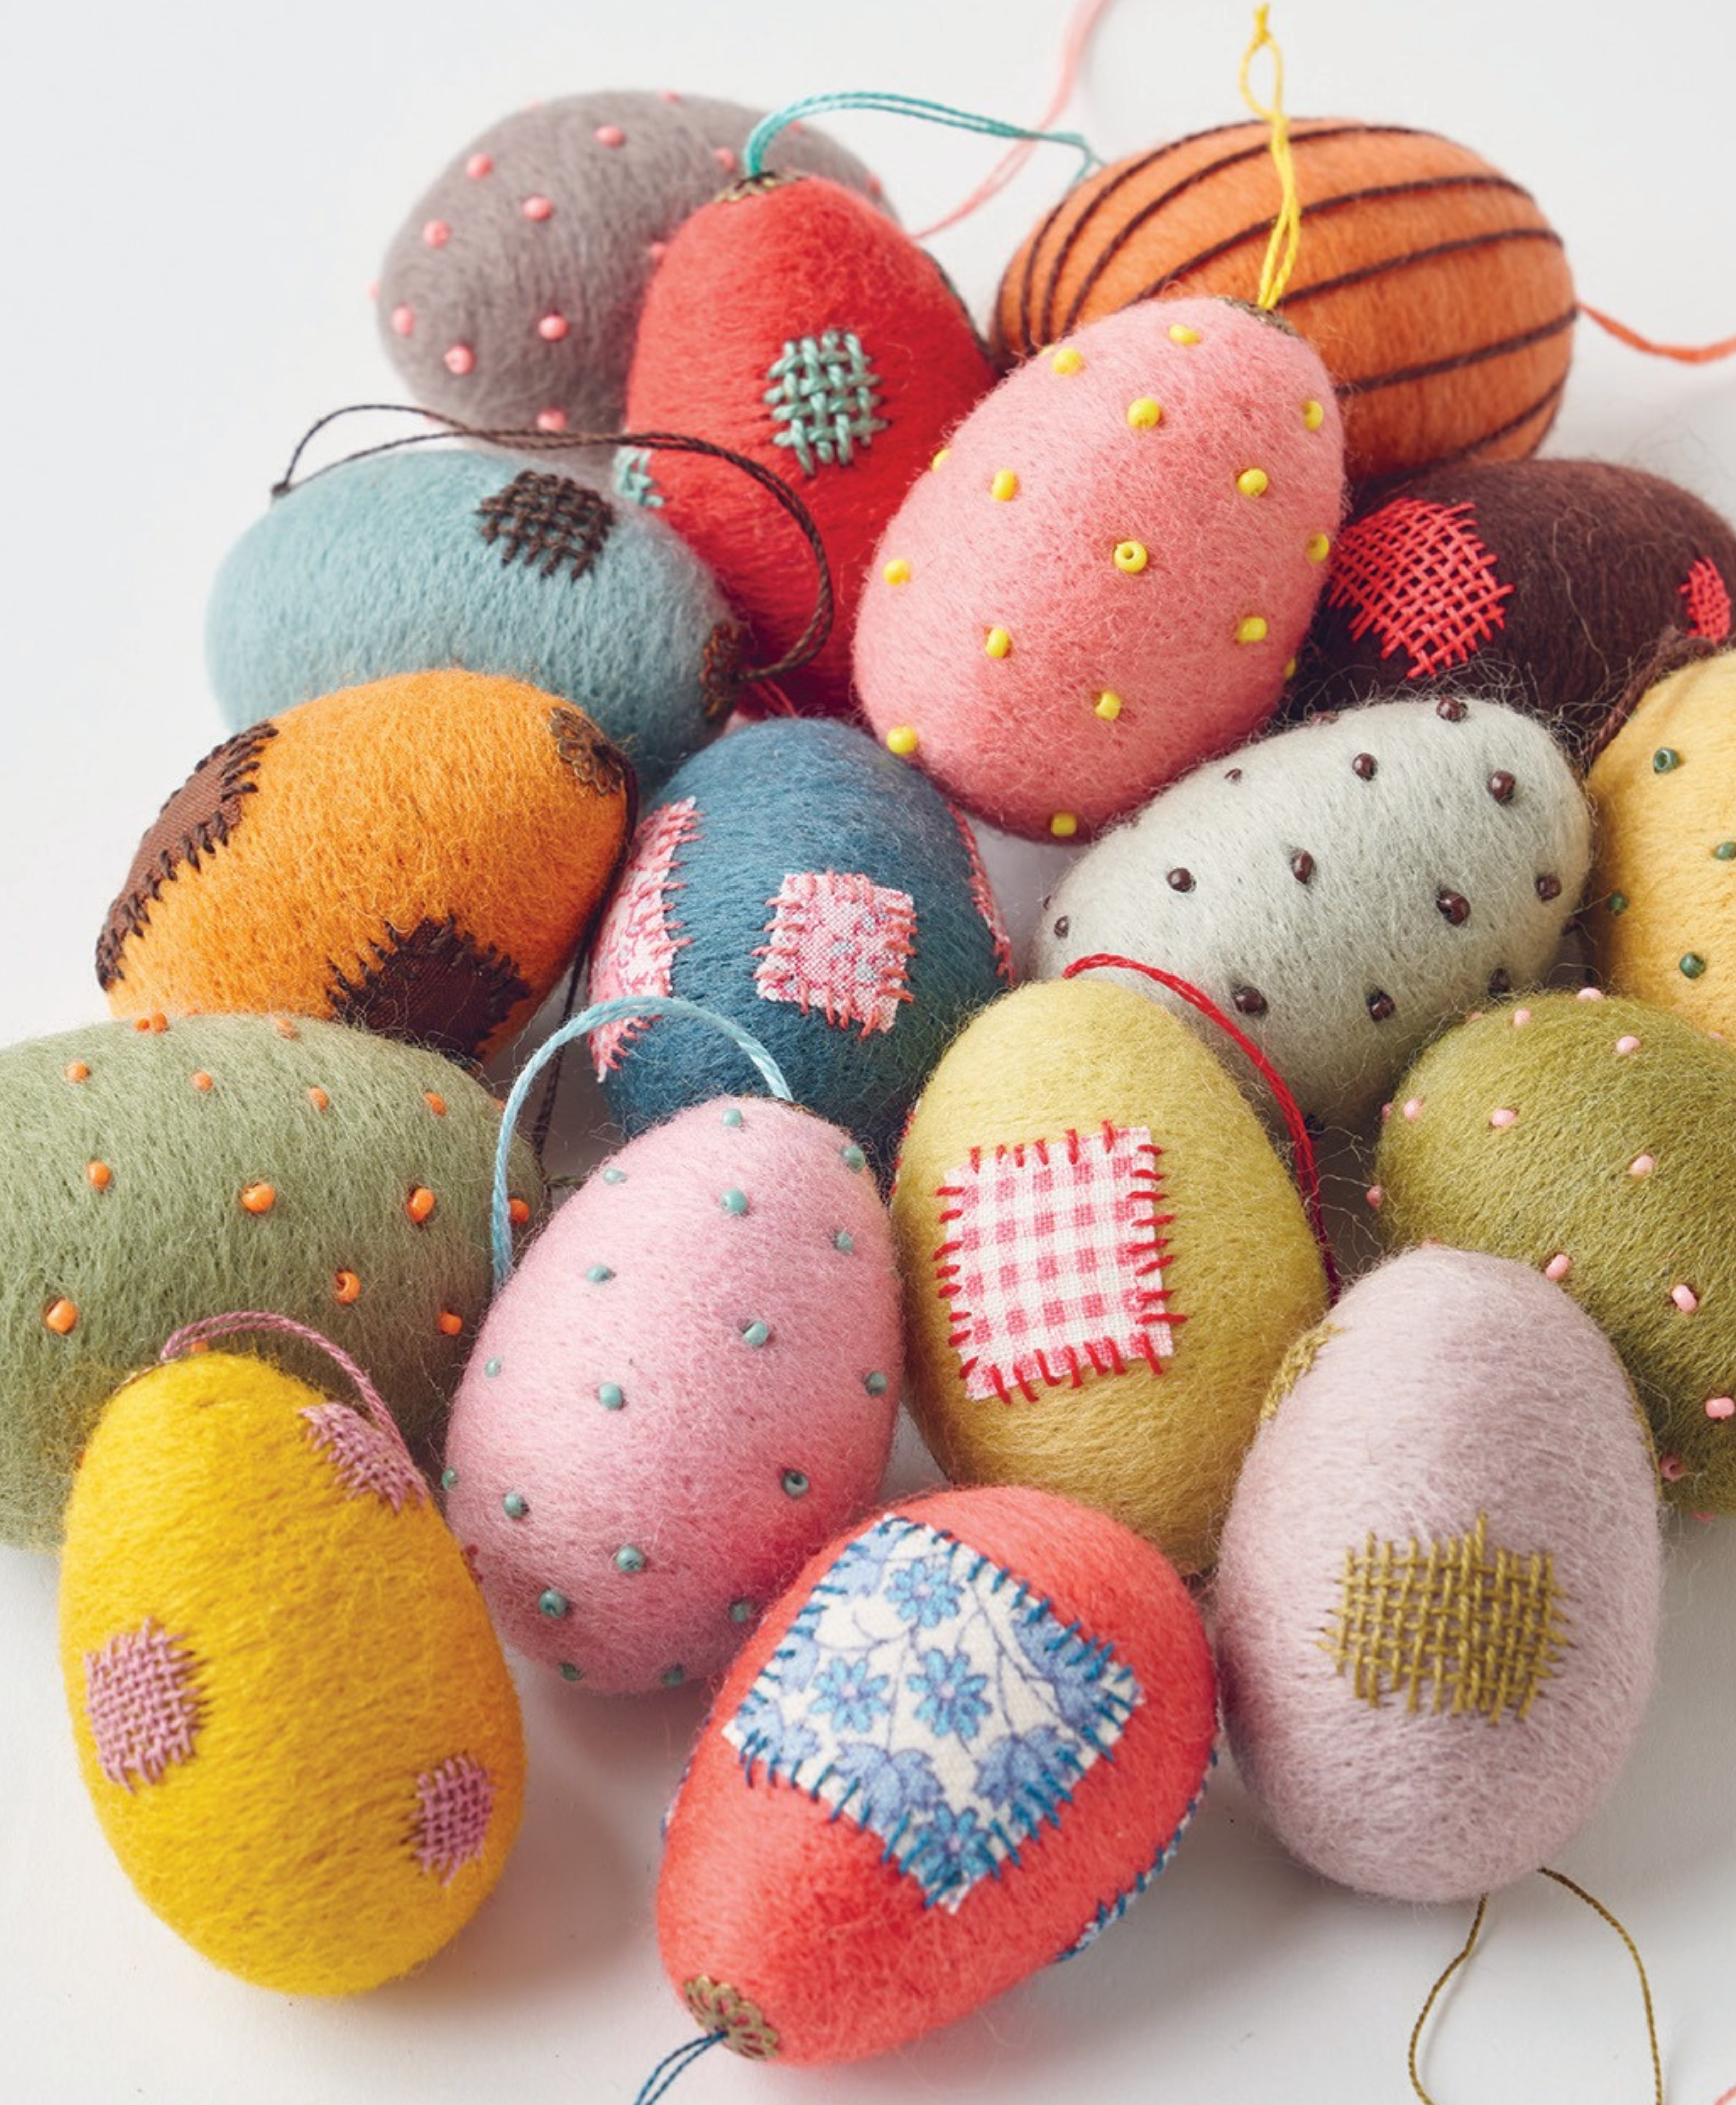
Easter jewel eggs
Easter trees are growing in popularity, with egg decorations as the star feature. Display them on a small branch or twig for a natural, woodland effect so that they really stand out. This is the simplest of patterns and yet there is so much scope for beautiful colour and decoration, so let your creativity run wild!
You will need
For each small egg (finished size approximately 5cm tall)
- Small amount of Merino woo l, about 15 cm in total
- Size 40 or size 42 felting needle (triangular or spiral)
- A felting mat
- Decorations – seed beads, embroidery threads, tiny fabric scraps
- Needle for adding dangle loop and optional jewellery cap (8mm bronze flower cap used here)
- Matching threads for the dangle loops
GRETEL’S TIPS
- I’ve colour matched my eggs with the loop threads and finished off with a small decorative jewellery cap held in place with three or four tiny stitches.
- If you’d like to make larger eggs, just increase the amount of wool and follow the same process.
MAKING THE EGGS
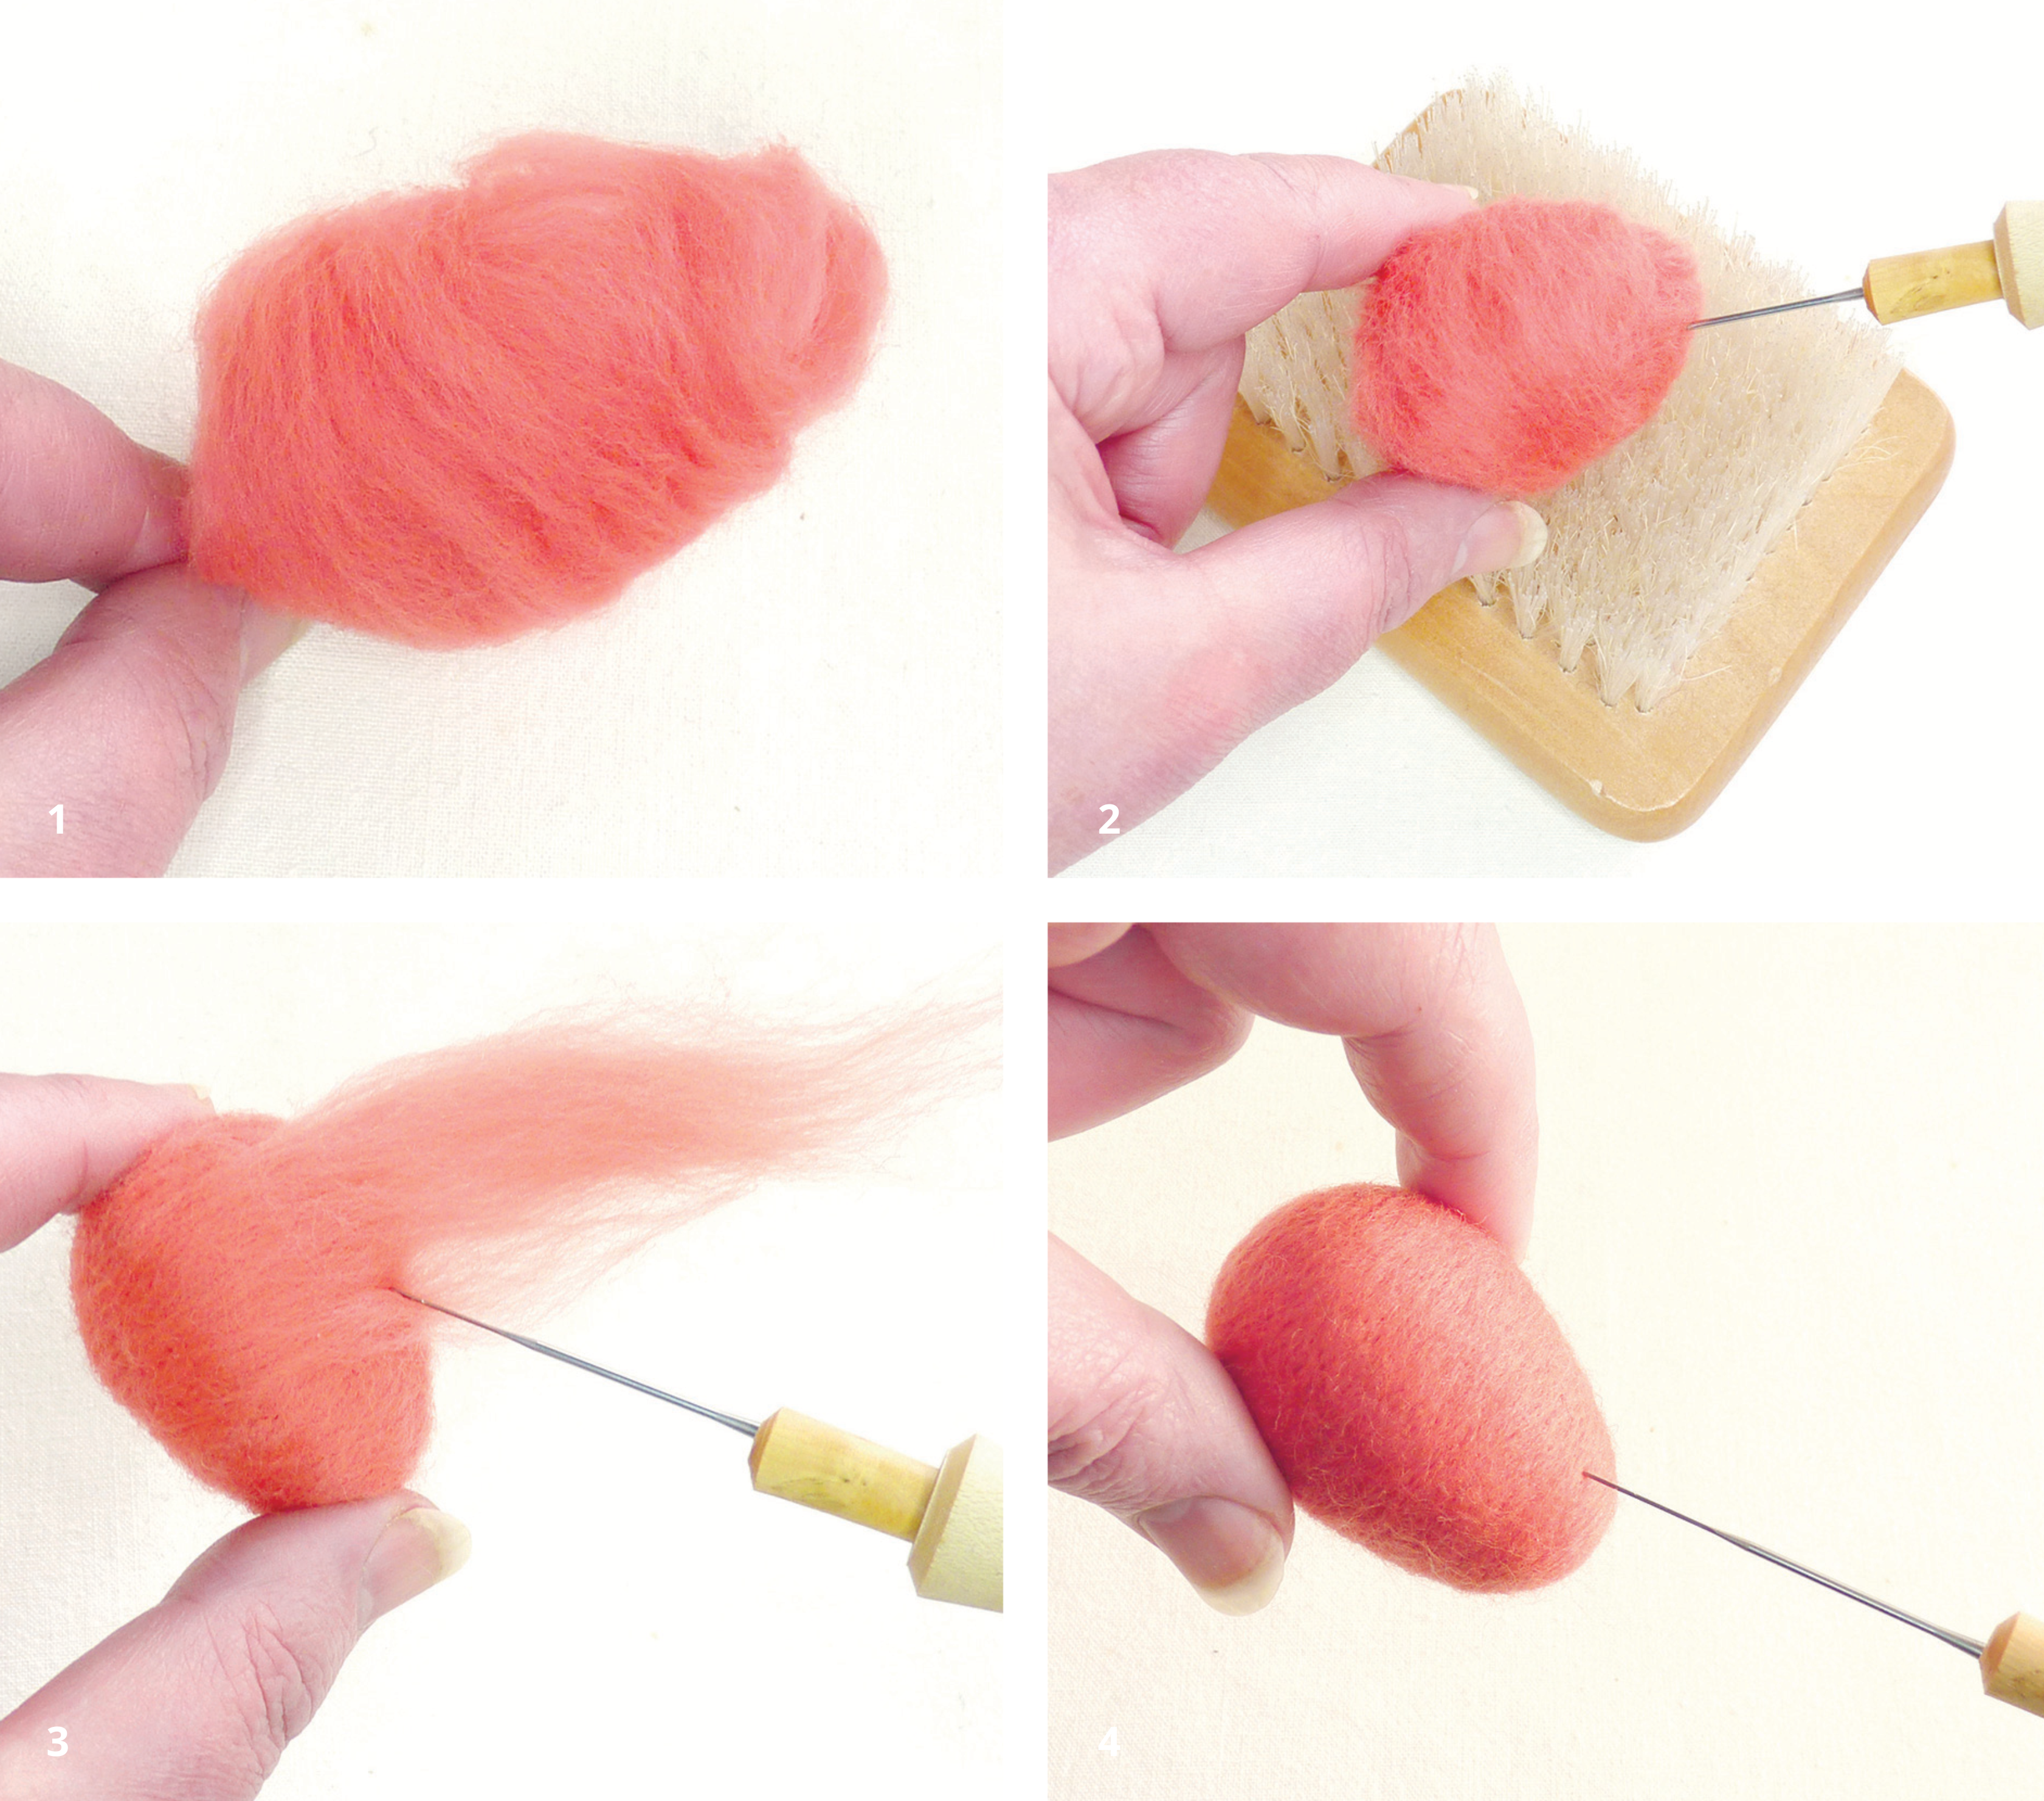
- Take a small amount of wool, approximately 10-12cm, and gently roll it up. Arrange it so that you have a fat end for the bottom and a thinner end for the top of the egg.
- Work it until it the wool thickens up, turning it as you work; this is important, as you want a nice rounded form. Add more thin layers, building the shape up gradually.
- The largest part of the egg is around the middle, so you may want to add some thin strips of wool around the ‘waist’ to create a lovely balanced shape.
- Your egg needs to be quite solid so that you can decorate it easily, so keep working it with small, even jabs until it really firms up and is ready for embellishment.
DECORATING YOUR EGGS (all sizes)
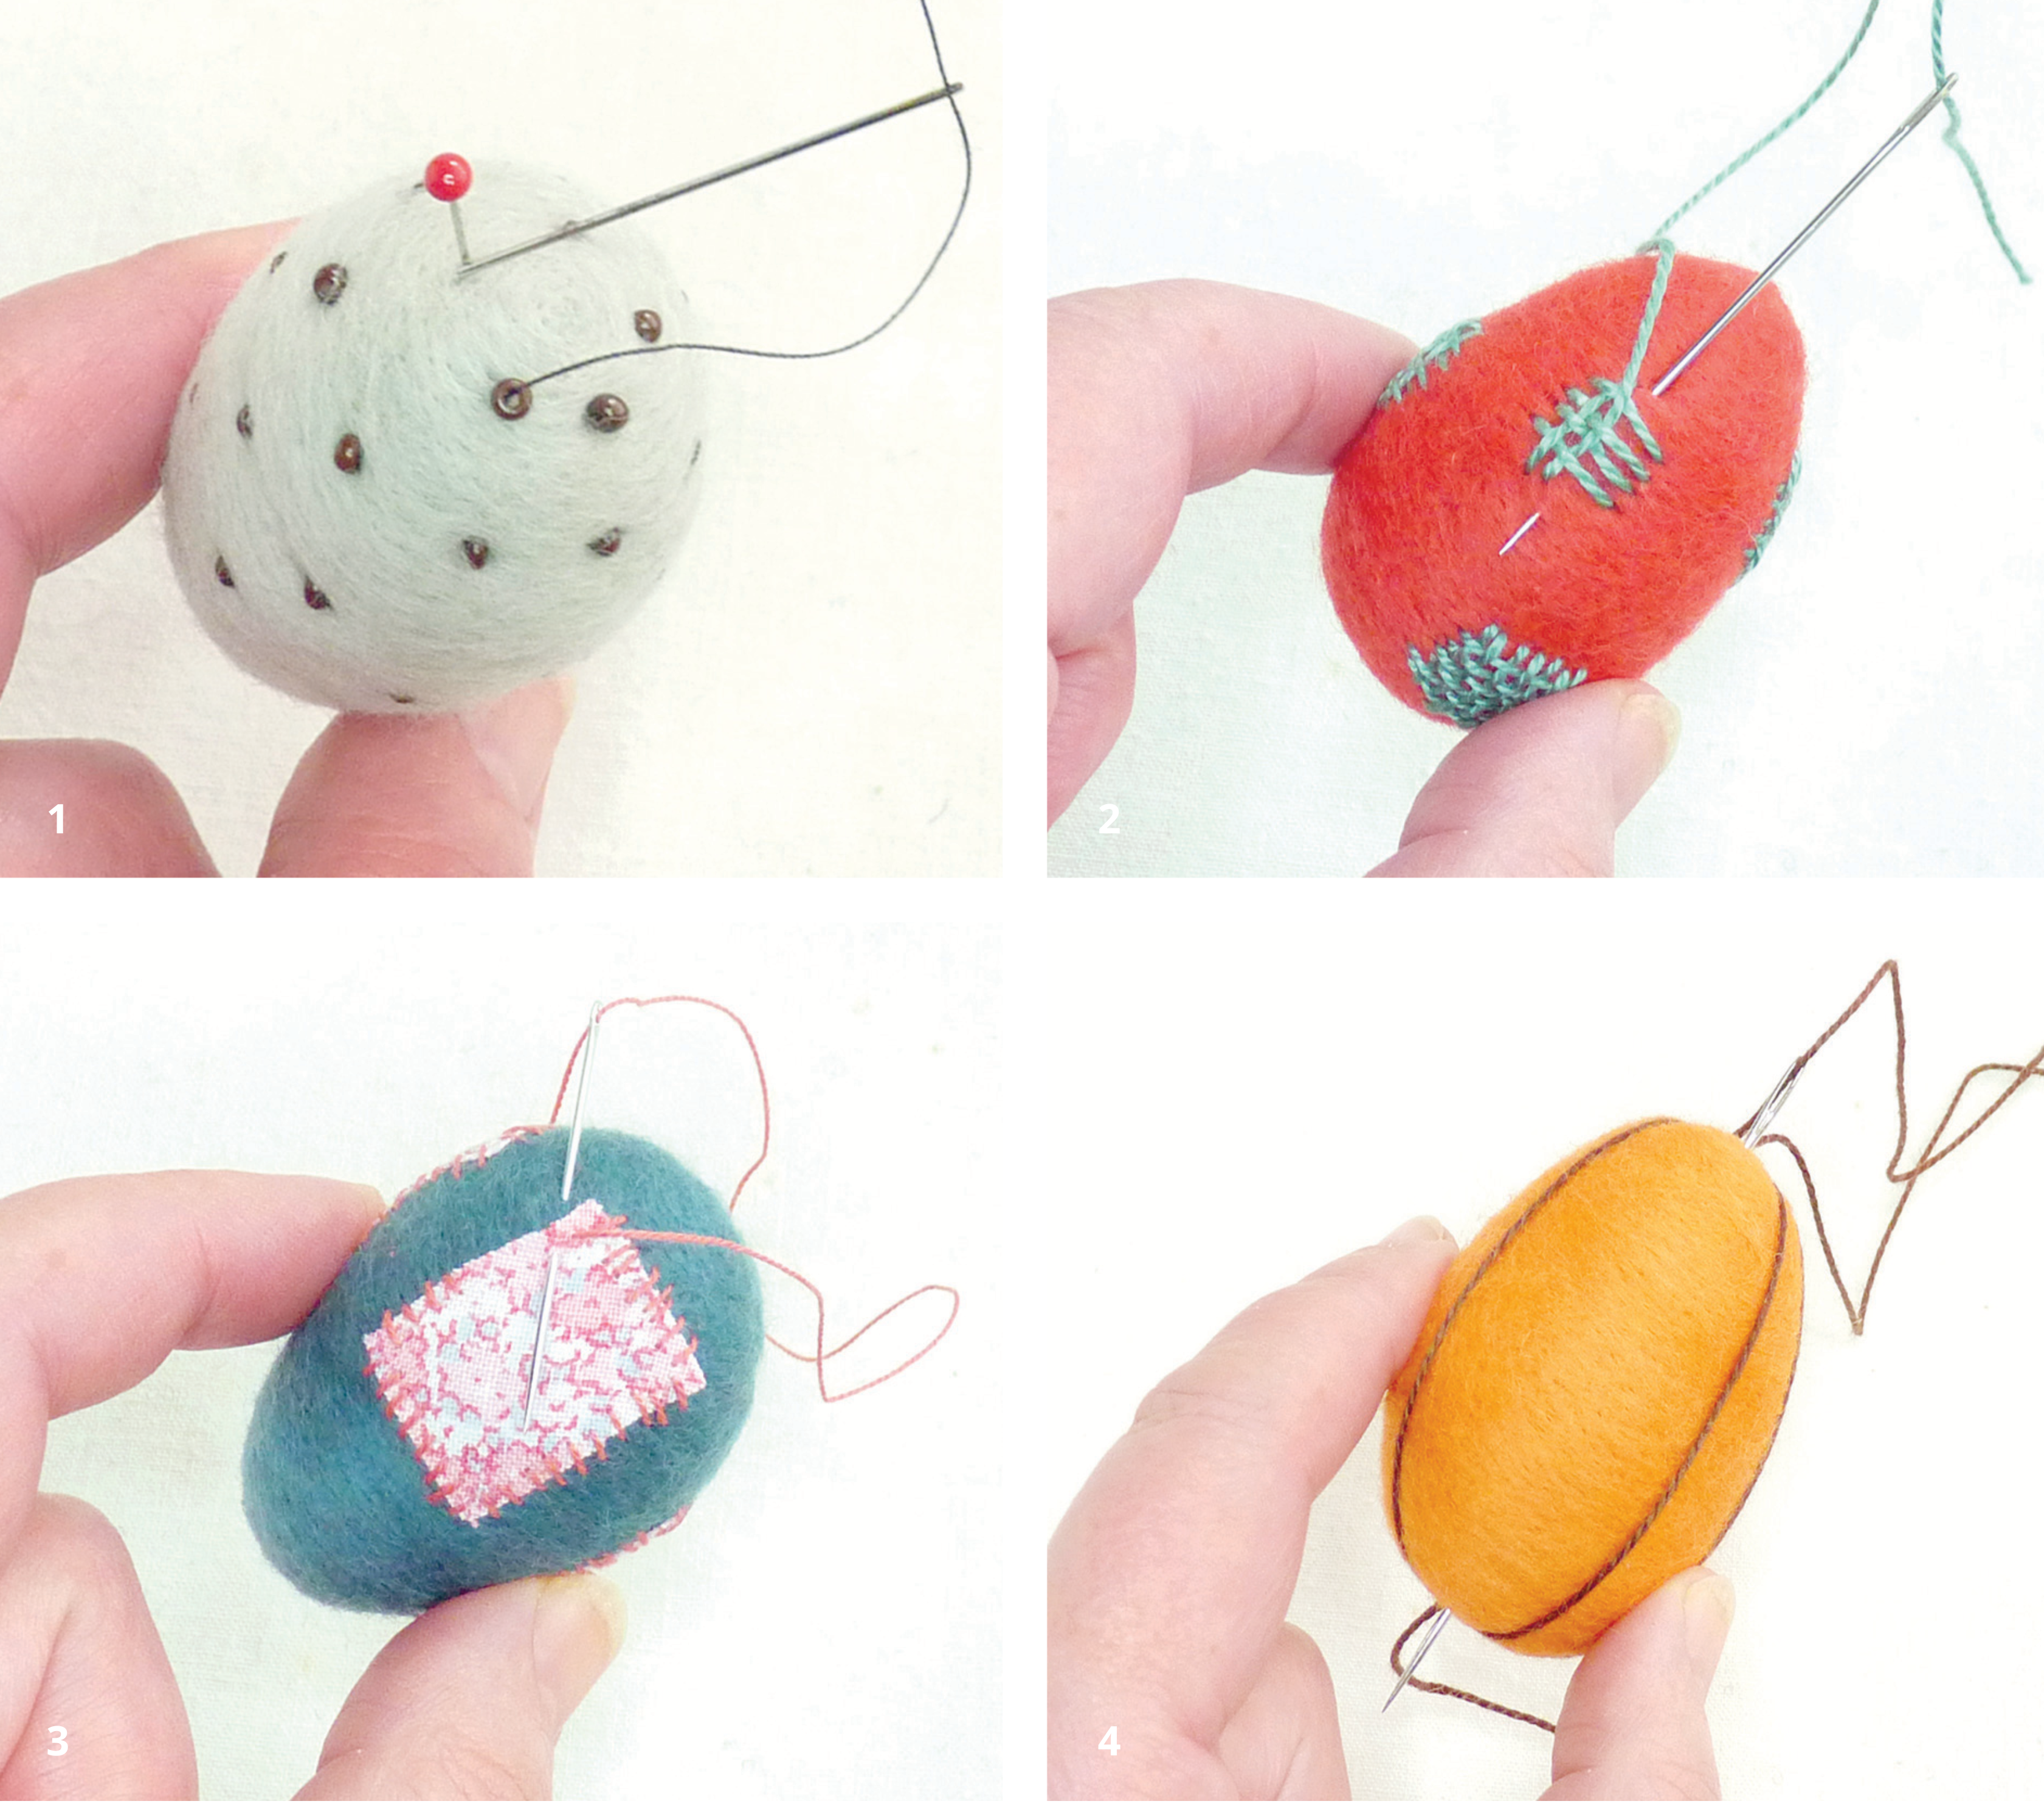
- To get an evenly placed pattern of beads, use the compass method. Larger beads will give a polka dot effect or use smaller ones for a sweet scattering of colour.
- Add little darns around your egg (see page 14) Use just one as a statement embellishment or a few various sized ones. Try thinner or thicker sized threads for different effects.
- Add miniature patches. This is a lovely way to preserve those tiny fragments of gorgeous fabric that you can’t bear to throw away.
- Create stripes by using long stitches. Use the centre of each end as universal points for your needle so that the stripes begin and finish in the same place.
Chirpy chicken bowls
The arrival of spring is such a joyous time of the year! It’s lovely to feature friendly chickens in one form or another in your home to celebrate the lighter days. Using these measurements will give you a small, palm sized bowl, perfect for displaying little sweet eggs.
You will need
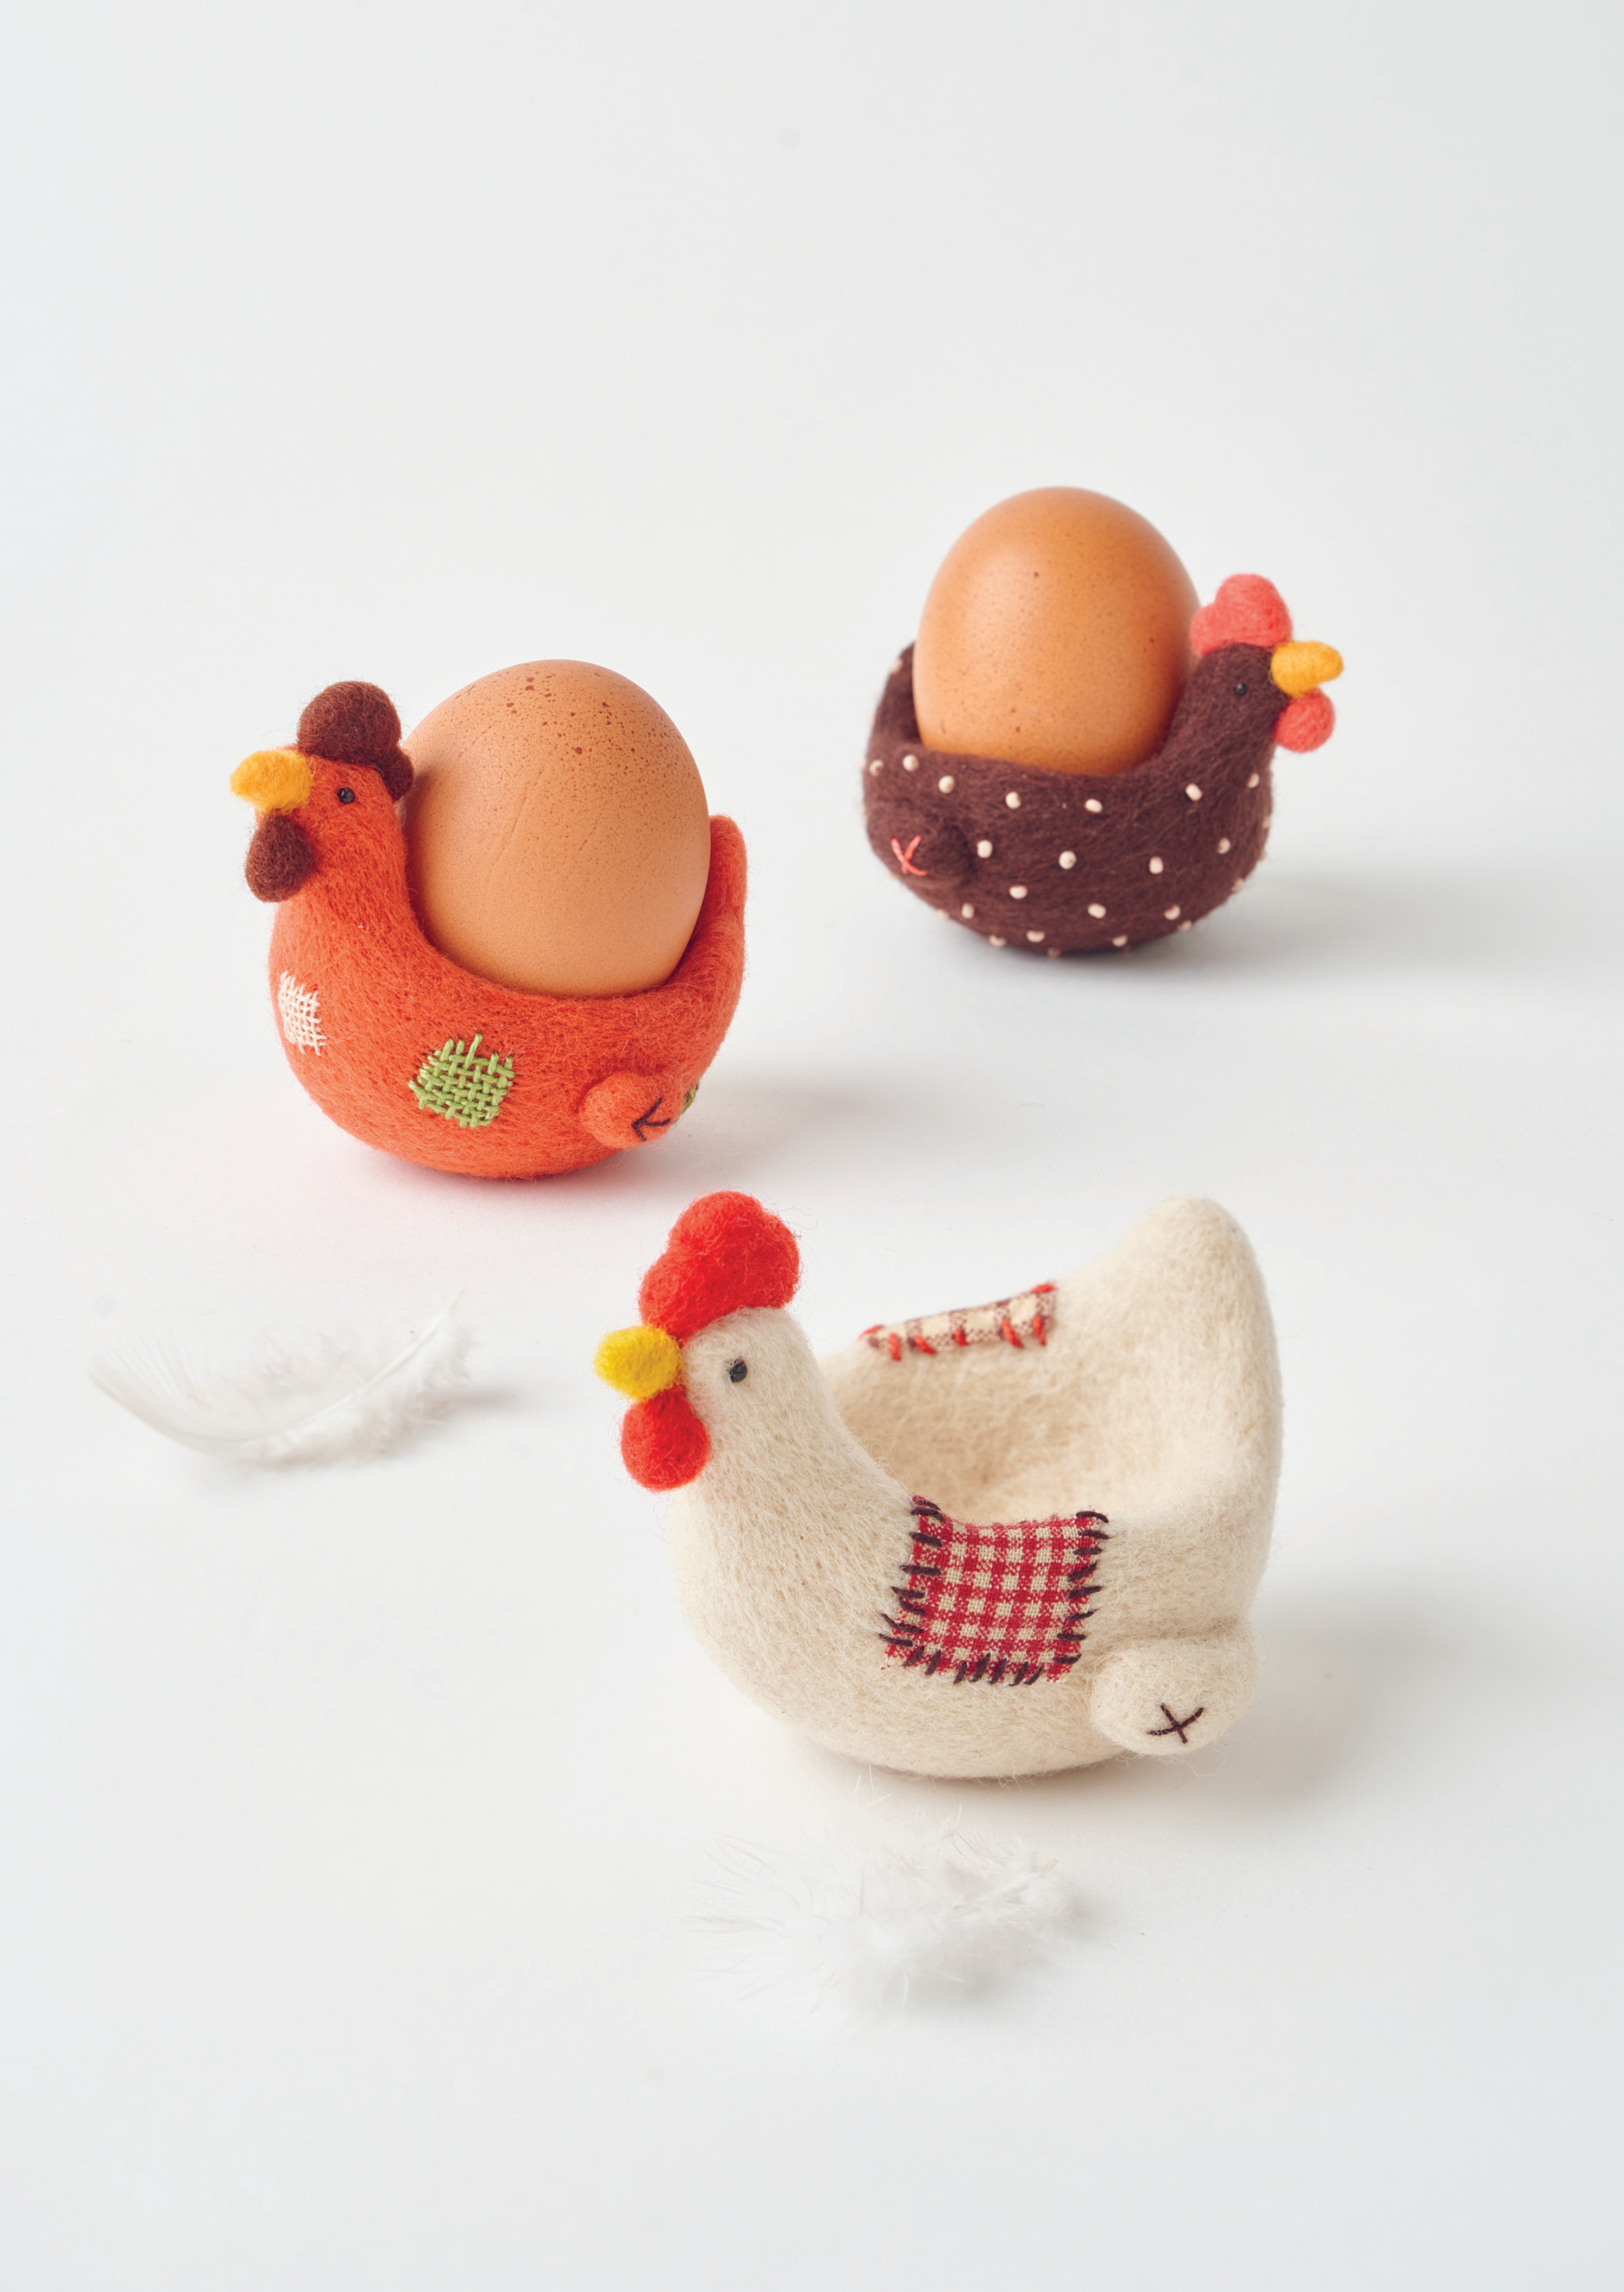
For each bowl (finished size approximately 7-8cm in bowl width)
- Merino wool, approx 25cm, in chicken colour of choice and small scraps of wattle and beak colours
- Size 40 or size 42 felting needle (triangular or spiral)
- A felting mat
- 2x black seed beads or 2mm onyx beads
- Strong black thread and a needle
- Optional decorations – seed beads, fabric scraps for patches, embroidery threads for darns and stitches (Danish Flower threads and DMC Perle used here)
GRETEL’S TIPS
- If you want to make a larger bowl, follow the same instructions but simply increase the amount of wool you use.
- This method of working follows the same principle as making simple hand built clay coil pots – gradually increasing the size by winding a length of wool round and round itself while working, to create the vessel shape.
STEPS
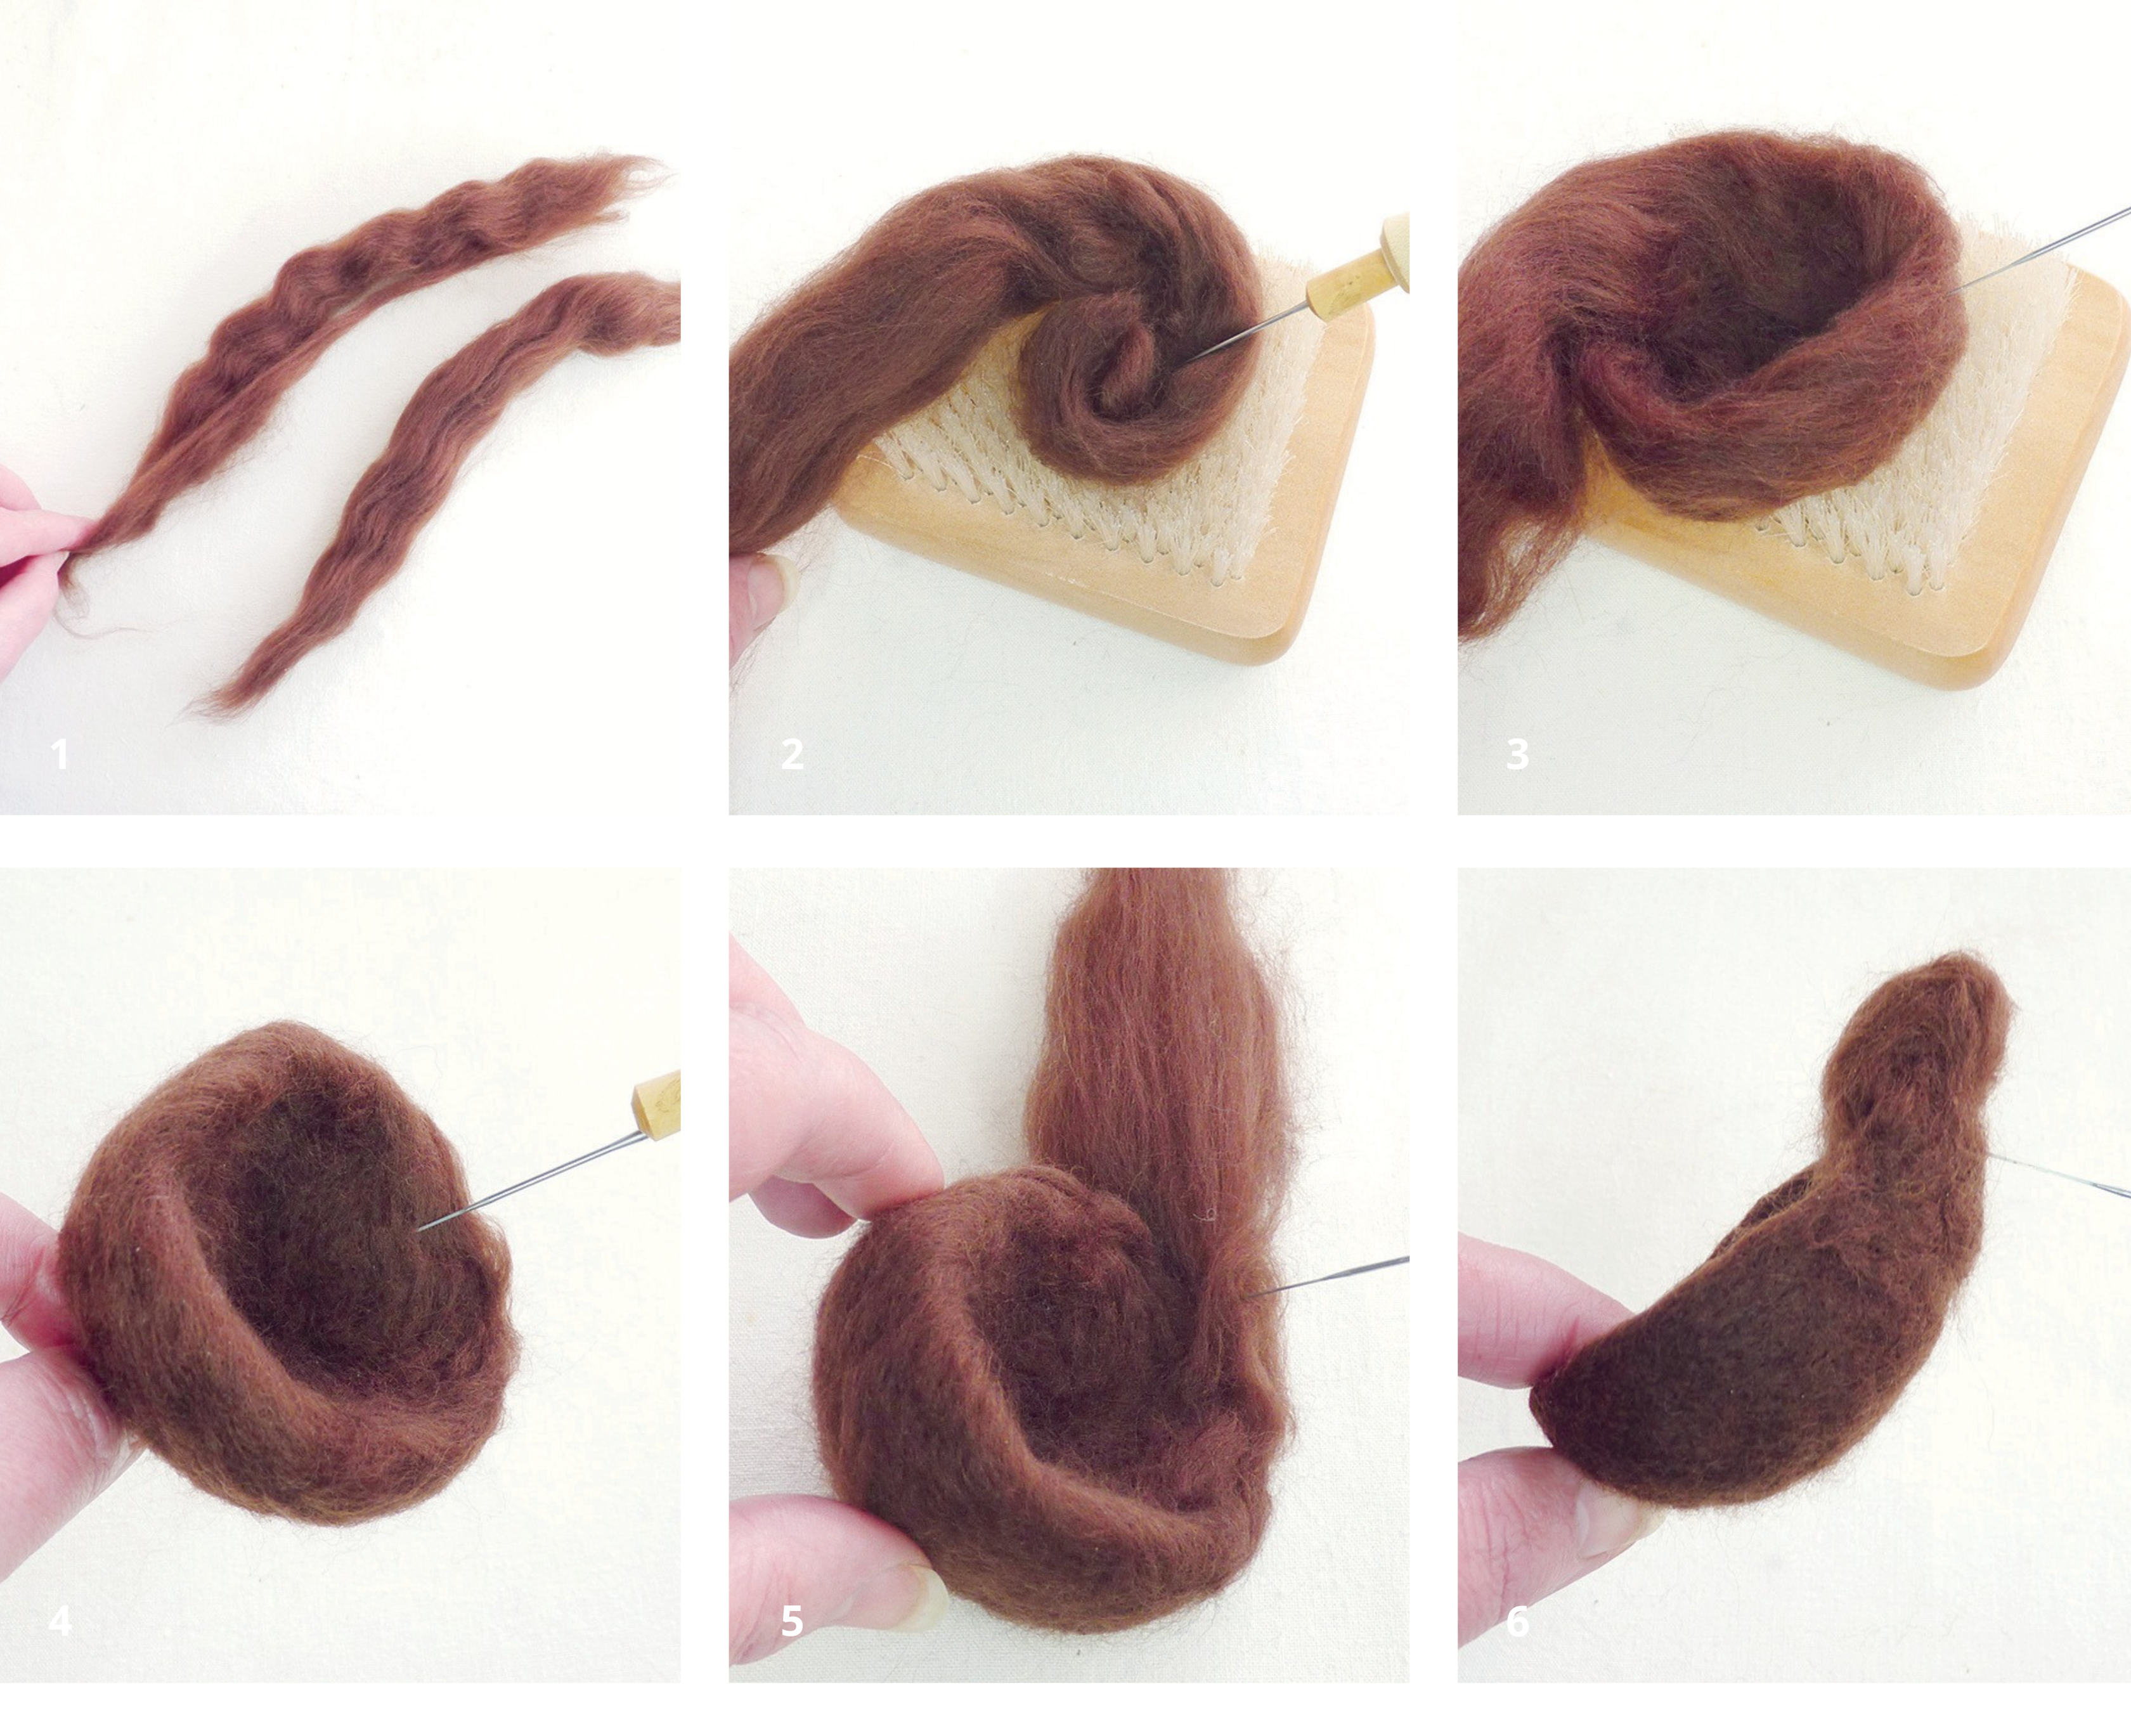
- Take a length of roving 25cm long. Split it in half lengthwise, so that it is roughly 4cm in width. Put one of the pieces aside for now and keep the other to use immediately.
- Begin by coiling one end of the roving around itself (like a snail shell) on the felting mat to make the base of the bowl, needling it into place to make a small, shallow spiral.
- When the base is approximately 4-5cm across, carry on winding and needling, building up the height and thickness of the bowl wall.
- As the wool becomes firmer, take it off the mat and work on both sides, firming up the bowl wall. Use the tip of the needle to distribute the wool evenly.
- If you need to, use some of the second piece of wool to increase the height. Keep turning as you work to ensure an even roundness until it is 6cm across the top and 3-4cm in height.
- Using a good pinch of wool, shape a tapering head, joining it to the bowl edge. You may want to add a bit more wool underneath to enlarge the chest.
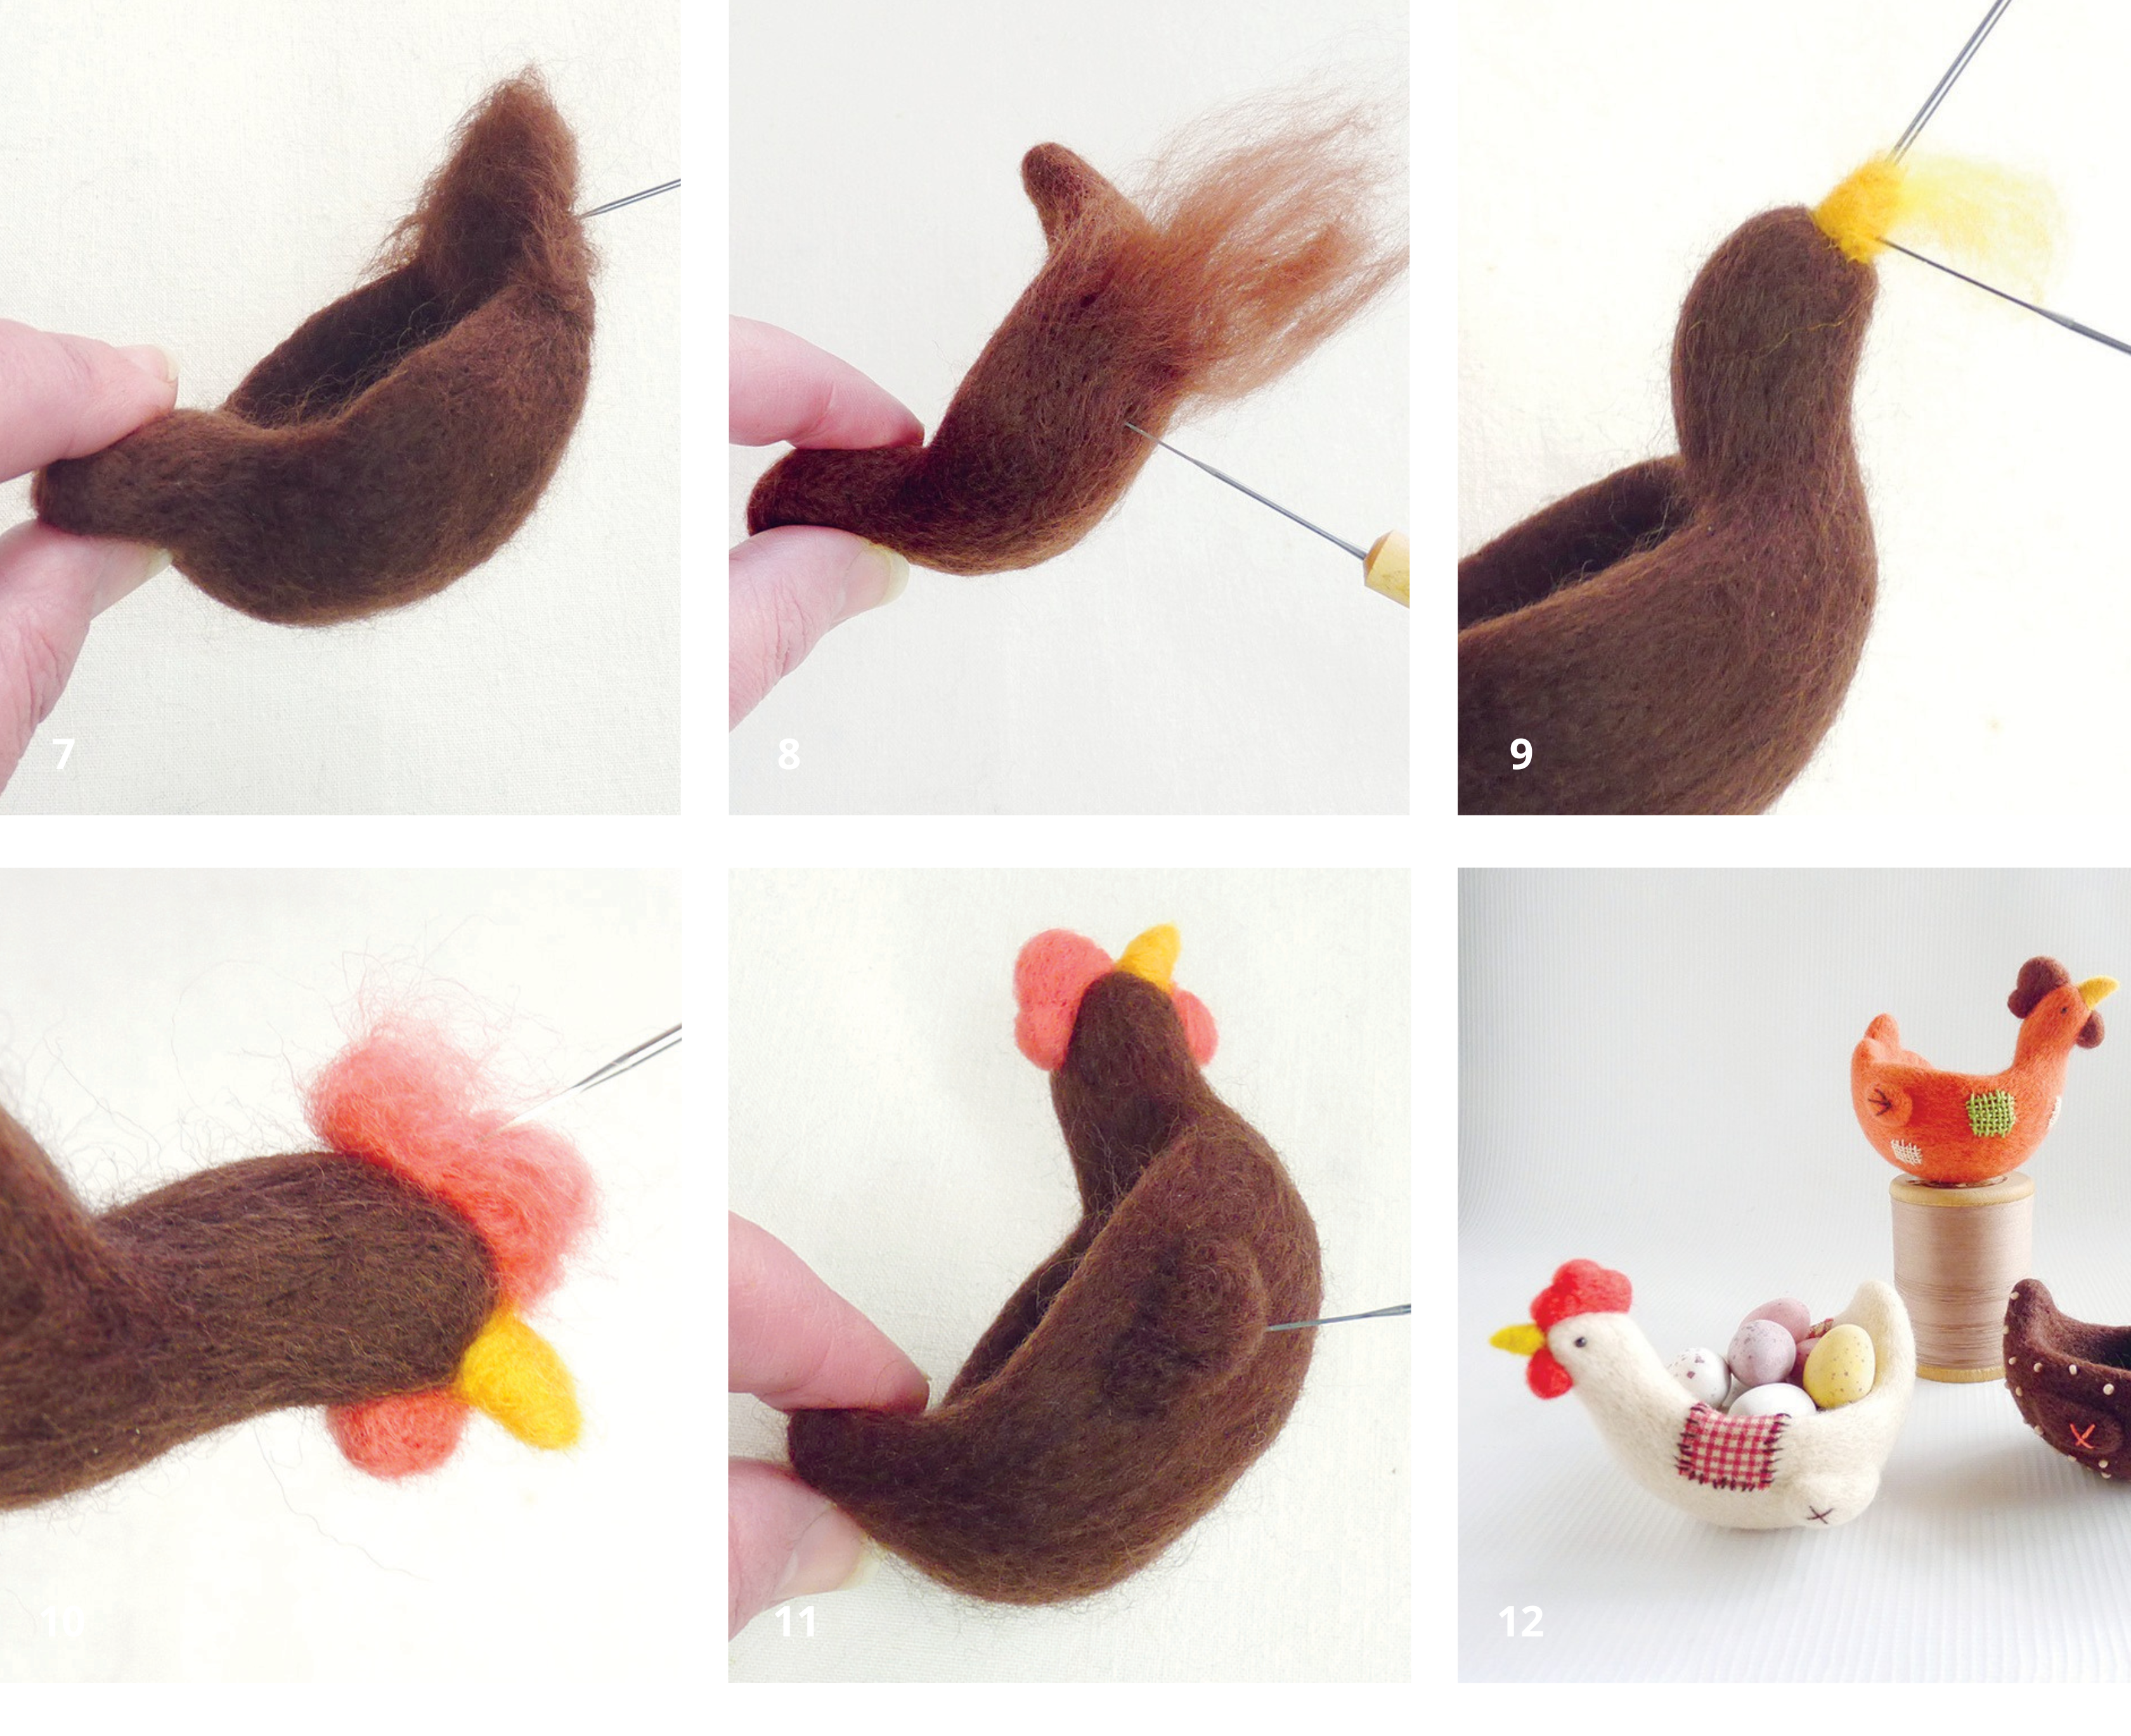 Add a perky tail using a good pinch of wool. Use the needle tip to sculpt a fancy scalloped end or keep it plain and simple.
- Neaten up the surface with a thin layer of wool and work the chicken all over, so that you have a sturdy base ready for embellishment.
- Add the beak by first inserting a spare needle at an angle. Wind a fragment of yellow wool around and up the shaft, needling until the beak is shaped. Remove the guide needle.
- Bright wattles are worked directly onto the head, using scraps of wool and the tip of your needle to shape them, before adding the eyes using the sideways method.
- Use two equal small rolls of wool to add rain drop shaped wings directly to the bowl sides. I’ve added simple stitches in contrasting thread for a rustic country look.
- Pretty up your chicken by adding seed beads for a speckled hen, or tiny darns or using gingham for patches.
Bunny pops
With the arrival of warmer days, it’s time to think about swapping your winter woolies for a lighter outfit, so why not make a darling Bunny Pop brooch to match? You can leave the jumper plain, or decorate it with a special, tiny vintage button or sweetly sentimental darns.
You will need
For each Bunny Pop (finished size approximately 10cm tall)
- 20 – 25cm wool for the head, slivers of pink for the ear linings and a few cm of wool in the colour of your choice for the jumper
- Size 40 or size 42 felting needle (triangular or spiral)
- A felting mat
- Bead eyes – I’ve used 4mm black onyx beads
- Pink embroidery thread for the nose
- A needle and strong colour matched thread for sewing on the brooch back
- Optional decorations – seed beads, embroidery thread for tiny darns, a vintage button
STEPS

- Take a length of wool measuring no more than 15cm. Fold it over and with the folded half at the bottom, divide the top portion of the fibres into two equal amounts for the ears.
- Shape the wool into a simple rabbit head. The front should be slightly rounded and the back should be flat. Tuck any loose fibres over and back into your work.
- If you work the front of the face directly on your felting mat, the back of the head will naturally become flat. If you remove it from time to time you will avoid the wool sticking.
- Use your fingers to pinch the ears into shape as you needle, to get a nice point. You can even the sizes up by adding a little more wool, if needed.
- Work the head until it is firm (especially the ears). Add thin layers of wool front and back to finish the surface off neatly.
- Use skinny slivers of wool to create the insides for the ears. Work carefully with the tip of your needle to get a clean neat outline.
 To make the jumper, needle small lengths of wool wrapped around the bottom of the head, making a gentle curve for the chin area. Keep the back flat, as you did with the head.
- When the jumper is built up, add an extra short strip to the front to form a roll neck and when it’s all looking nice, cover it with a thin layer of wool to finish it off.
- Sew in the eyes using the front facing method and tie the threads together at the back. If you don’t have beads, use French knots sewn with black embroidery floss.
- Sew a nose and mouth by stitching a little X and filling in the top part with a few tiny stitches, making a triangle to indicate the nose.
- Attach a brooch pin to the back with strong thread, patching over with wool for extra strength. I placed it vertically to carry the weight evenly.
- Decorate the jumper with a pretty button, seed beads or darns, to give your bunny a unique character.
Order your copy here.
